In this article
We will guide you through the process of creating dynamic banners using Adnami, which can fetch data from XML + JSON feeds and Google Sheet. This feature allows you to easily update the content within your banner without the need to create new banners or upload new versions.
Prior to starting, it is crucial to either have the knowledge or ability to create HTML5 banners or request the help of a developer who can complete this task on your behalf.
For developers: Feeds API documentation
Watch the video below to see how to set up a feed that can be applied to a banner!
Step by step guide to setting up a feed
Step 1A - Creating a Google Sheet feed
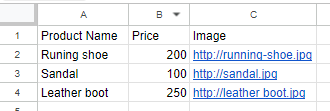
The first step is to create a feed with the specific parameters you want to make dynamic. A simple product feed can look like this:
Guidelines for the Feed:
- Use a Google Spreadsheet that starts with this link: https://docs.google.com/spreadsheets
- The first row should be the column’s headers.
- Column’s header names must be unique and cannot be used twice.
- The feed can have a maximum of 15 columns and 50 rows of data.
- Any modifications made to the feed will be detected automatically, although there may be a delay of up to 15 minutes.
- Invalid and empty rows will be skipped.
- Images URLs have to be an direct path and should be no more than 1mb each.
- Hosting feed assets, such as images, in Google Drive is possible. Just make sure:
- you have the direct path to the file, e.i. direct link to the image, not the folder as this will throw errors.
- that the asset is viewable to all.
- How to get a Google hosted Image asset for the Dynamic Banner:
- 1. Upload the file to Google Drive to get the asset ID from Google (in bold below) from the file path. You should be able to get it by opening up the asset preview in a new window. Please note that the ID should not come from the folder path. See example below.
CORRECT:
https://drive.google.com/file/d/1rw4yuFeDCOZy53oMEsINllTET5Yqklmo/view
INCORRECT:
https://drive.google.com/drive/folders/15XDqbAVPp3kuf8emHVEUWmVyGaySps3A
-
-
- 2. Add the asset ID to the following download link:
https://drive.usercontent.google.com/download?id=xxx where xxx is the assetID from Google. Like this:
https://drive.usercontent.google.com/download?id=1rw4yuFeDCOZy53oMEsINllTET5Yqklmo - 3. Add the modified Google url to your feed.
- 4. Check that the modified asset url works by opening it in another window and preview your images.
- 2. Add the asset ID to the following download link:
-
Steb 1B - Creating an XML and JSON feed
Step one is to get access to the XML or JSON feed containing the parameters you want to make dynamic. Many ecommerce systems can configure and output XML or JSON based product feeds.
If your feed needs further modification we recommend to use https://www.channable.com/
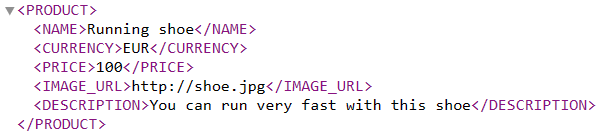
A simple xml feed can look like this:
Guidelines for the XML and JSON feed:
- Node elements must be unique and cannot be used twice.
- The feed can have a maximum of 25 node elements and 50 nodes / 25 properties and 50 items.
- Any modifications made to the feed will be detected automatically, although there may be a delay of up to 15 minutes.
- Nested data within repeating node will be ignored.
- Images in feeds should be no more than 1mb each.
Step 2 - connecting the feed to a campaign
Feed Url
Once you have the feed ready, go to the campaign within the Adnami platform and find the "Feeds" tab.

Click on "Feeds", and on the right side of the screen, you will see the "+ New Feed" button. Click on it and paste either the URL to your XML feed or the URL from the Google Sheet you created. Then, click "Verify feed."
To proceed, the Adnami platform requires access to your Feed/Sheet. You can ensure the Google Sheet is either available to anyone or shared with Adnami using the email address provided during the feed setup. Access can be revoked at any time, and the updating process will cease.
Columns
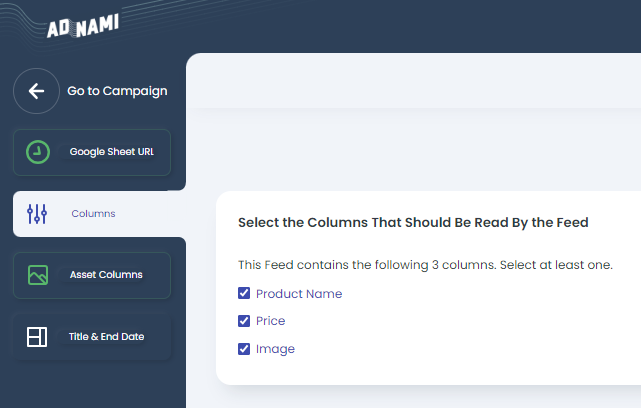
Next, you will be asked to select the columns from the feed that you want to include in the banner.
In this example we use a small feed with only 3 data columns, so we select all. There is a limit of max 20 columns.
Note that spaces in column names will be sanitized before being made available in the dynamic banner following these rules:
- Spaces before and after a column name will be removed. " ColumnName " will become "ColumnName"
- Spaces inside a column name will be replaced with underscores. "Column Name" will become "Column_Name".
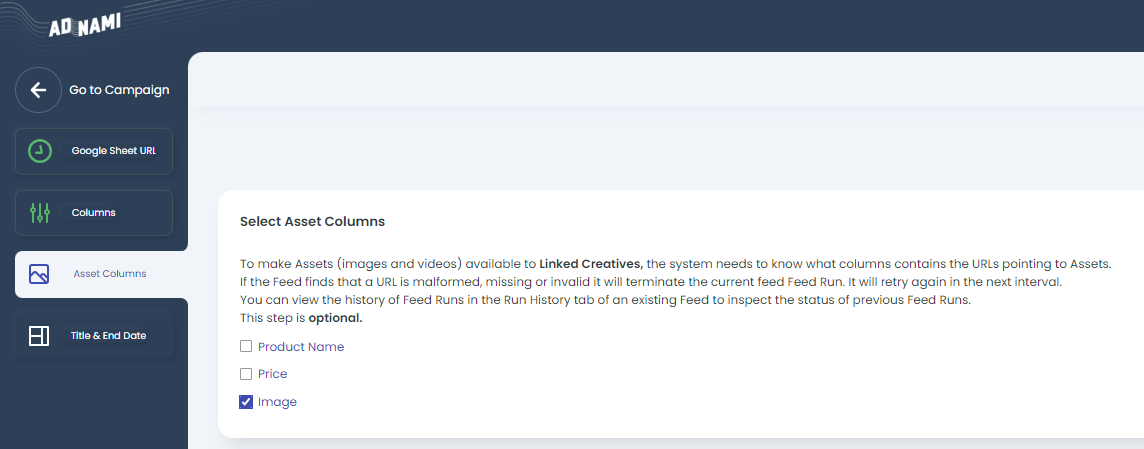
Assets
Additionally, you should mark the columns that contain assets such as images and videos to ensure compliance with GDPR regulations and optimise performance. Adnami will copy all assets to its servers for this purpose.
One last thing
Make sure to name the feed with a nomenclature that makes sense to you and set an end date for the feed. Keep in mind that a feed has a maximum active time of 3 months, after which you can upload a new feed or simply extend the lifetime of the existing feed. . .
Click "Create feed" to upload the feed, and it will be ready to use in a banner. Adnami will update the feed every 15 minutes, and changes will reflect in your banner.
Step 3 - building the banner
Now you or your partner can build the banner using the provided documentation [Feeds API documentation]. To make it easier for developers, go back to the feed in Adnami and click "Download Feed Sample" to get a sample feed for testing.
You can build the banner using one of our Dynamic Feeds Templates:
- Hybrid Product Carousel
- Fluid Product Carousel
Or, if you're advanced in HTML5, you can create your own banner.
Step 4 - upload banner
Once you have the HTML5 banner ready, go to the campaign and upload it as a "Zip File." Ensure that you upload it to the campaign where you previously uploaded the feed; otherwise, it will not work.
Go to the parameters section of the creative and make sure to select the right feed for the banner.

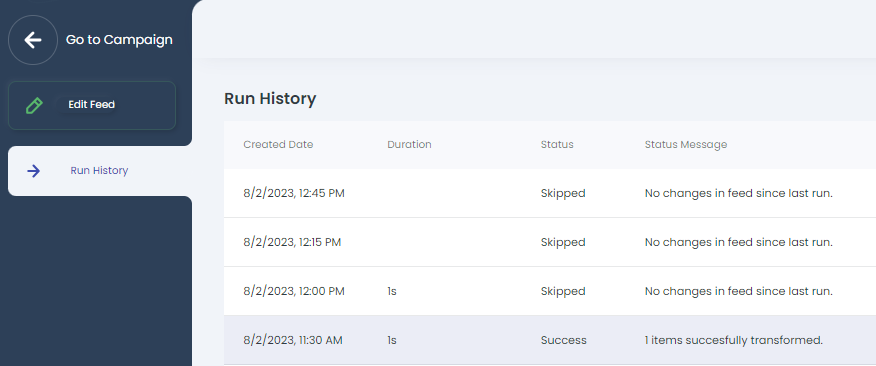
Updating and detecting errors
You can update both the feed and the creative at any time. It is helpful to verify that everything is working correctly. You can easily check the feed in Adnami to ensure it's updating as expected, particularly if you make changes while the campaign is running.
💡Good to Know: How Product Order Works in Dynamic Hybrid vs. Fluid Carousels
Hybrid Carousel
-
Product order is random if Shuffle Feed (under Carousel Settings) is enabled.
-
If disabled, it follows the row order in your product spreadsheet.
Fluid Product Carousel
-
Always follows the row order in your spreadsheet.
-
Shuffle is not available.
👉 To prioritize a product, organize the order in your feed, unless using shuffle in Dynamic Hybrid.